Photography Basics for Beginners
Whether you’re just starting your photography journey, or you’ve been in the game for a while and need some refreshers, here are some of the basics of photography that you need to know! Photography is more complex than some may understand, but don’t let that simplistic idea fool you. There is actually a lot of aspects that go into the work. Smartphones have certainly transformed basic photos into a work of art, but nothing will compare to holding a DSLR in your hands, adjusting the lens, and capturing that perfect moment. To begin, there are a lot of areas in photography that not many people know about. Here, I have organized them into 5 categories that you can further explore if one piques your interest.
Event Photography

An event photographer specializes in capturing any and every type of event. An event photographer captures things such as maternity photos, baby showers, concerts, sports, weddings. Typically, event photographers do not involve a ton of setup or equipment since event photographers are always on the move trying to capture special moments. Though, it may be best to have a lightbox that you can easily move around. One common rule for event photographers is to always wear black, so you don’t draw attention to yourself. The point is to blend in, so you can capture people in the moment and get the perfect candid shots.
Nature Photography

Nature photography covers a wide variety of subjects including the outdoors, wildlife, landscape, skies, and other natural environments. This is a more relaxed type of photography but can involve a lot more time spent setting up and waiting around for the perfect moment to capture. Whether it is a sunrise, sunset, or the perfect animal to come by, you should be prepared to spend some time preparing and waiting for the perfect shot. This style of photography is for people who love the outdoors and have a lot of patience.
Art Photography

This photography style does not typically involve models or live subjects, though it could. Rather, it involves objects and the photographer's vision and interpretation of a particular subject. This style could involve architecture, paintings, still life, etc. A lot more effort is put into lighting, shadows, and exposure settings to highlight the creative aspects. This style is for those who want to express a lot in their photos in order to create something visually appealing and make a statement.
Subject Photography

Subject photography means any object, person, or animal in a photograph. The subject is the focus of an image but can have an elaborate background (or not) but however, you decide to do it, make sure it is balanced, and avoid having focal points that may take attention from the main subject. Portraits, boudoir, and family photos are some examples of subject photography.
Promotional Photography

This is probably the type of photography you see the most often without even realizing it! This style is all about photographing objects or people with the goal of advertising that object or person. Promotional photography is a great way for businesses to achieve marketing goals because it makes things look appealing to consumers and encourages them to make a purchase. Don’t let the business aspect fool you though, because this can be just as creative as art photography!
Now, this is cool and all, but what about the camera itself? It is just as important to understand your camera as it is to understand what area of photography you enjoy. When I was a beginner, I chose a DSLR camera because it was much more simple than other cameras, but it was also of higher quality than a basic camera. Most people think that a photographer just points the camera and clicks a button, but that isn’t always the case. There is a lot of detail that goes into setting up a camera before we get to the fun picture-taking part. Understanding your surroundings is a key element. Are you in a bright outdoors area, or is it a quiet and dark room? Does the area have a lot of people, or is there hardly anyone there? Are there clouds, or even snow, where you’re at? Do you want to express motion in your photo, or do you want it crisp and clear? All of these thoughts are things to consider when you’re taking a photograph with a DSLR.
Camera Basics

DSLR stands for Digital Single-Lens Reflex camera. The digital part in this abbreviation just means that the camera is digital. There are plenty of other camera options. Single-Lens means that there is a singular lens used for taking the photo, focusing, and framing the photo. Another benefit of having a DSLR is that, for most cameras, you can change out the lenses. Most DSLR cameras come with the basic 18-55mm lens (this is the focal length of your lens; the closer you are to your subject when you zoom in the higher the millimeter, or mm, is). There is a wide range of lenses, but to get started the 18-55mm will be the best! Reflex is about the mirror inside the camera, and for a DSLR it means that the mirror is flipping inside the camera to direct light towards the optical viewfinder. It’s fairly simple: the light goes into the camera, you focus the lens to your liking, the mirror inside your camera flashes the optical viewfinder, and then the image is on your SD card!
In order to understand more about the quality of the photos you’ll be taking, we have to learn the basics of photography when it comes to the controls on the camera. The main things to consider are aperture, shutter speed, and ISO. You can see all of this on your camera’s digital screen, but what exactly do they mean?
Aperture

First, the aperture is the opening of the lens so that light can pass through. Aperture is measured in f-stops. On your camera, this will read as f/(number). The higher that number is, for example, f/8, then the less light you will let in. The smaller the number, for example, f/1.4, then the more light is let in. There is much more that goes into the aperture, however, to put it simply the larger aperture you have the more light you’ll let in, the smaller the aperture then less light is let in.
Shutter Speed
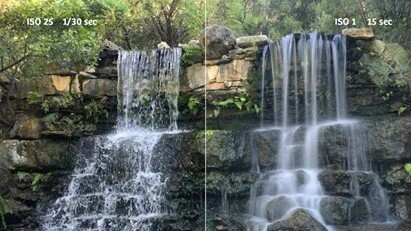
Shutter speed is how long light is exposed, or exposure. Shutter speed is in charge of how bright or how dark your photo is. It’s important to note that this can also lead to an overexposed photo or an underexposed photo. To tell if a photo is over/underexposed it will appear either way too light and almost look white (overexposed), or way too dark (underexposed) and will appear as if it is nighttime when the photo was taken during the day. Not only is shutter speed in charge of the brightness or darkness of a photo, but it can also create a blur effect, called motion blur, or have absolute clarity. For instance, if you’re capturing a photo of a waterfall you can slow the shutter speed to blur the water or you can speed the shutter to keep the water still in the photo. Shutter speed is measured in fractions of a second, so 1/4th is one-fourth of a second. Having a higher shutter speed, such as 1/8000th, will speed the shutter and create crisp and clear photos. A 1/4000th shutter speed will give the blur effect on a photo. The higher the denominator then the clearer of a photo you will get.
ISO

ISO is simply the camera's sensitivity to light. ISO is measured in 100’s, starting at 100, then 200, 400, 800, 3200… etc. Choosing a higher ISO can be a bit tricky, as the aperture, shutter speed, and ISO all work together to create a beautiful photo. If the lighting is well in a setting, then keep your ISO low (ISO100, or ISO200 for example). There’s already plenty of light to work within that setting, so you won’t need a high ISO. When a setting isn’t well lit, then you may consider raising your ISO (such as ISO800 or ISO3200). However, the more you raise your ISO then the grainier your photo could turn out. There will always be that sweet spot with all three, so it’s okay if you have to take a few practice shots in a setting before you get it right. When I first started, my photos were not the best, and this was largely due to the fact that I almost never changed my ISO. It’s easy to forget about but comes in super handy when you figure out how to function all three together!
I know this seems intimidating, but trust me when I say that it does get easier. These basics of photography are necessary, but they do begin to come naturally. Don’t give up hope. Whether it’s a hobby or you’re looking for a potential career in photography, it is absolutely thrilling when you get that first photograph that you’re proud of. It will happen. I didn’t get that shot until almost a year after starting my journey. I also had to try many different types of photography before finding my favorite. I’ve included a photography cheat sheet I made just for you, so you can quickly and easily access the information you need while you’re out! Good luck, you got this!
