Essential iPhone Tips for Taking Professional-Like Photos!
It’s the basic boring Instagram photo for me… but it doesn’t have to be. A lot of my Instagram followers, and even people I follow, struggle to take a decent photo. Unless you’re a model and have your photos taken professionally, it can be difficult to get the right angle. Using these three basic tricks will completely change your social media look and may even help you gain a few followers!
Tip One: Angle’s my Angels
Selfies are very 2012. You know the type, where your face is in the corner and you can very clearly see your arms holding your phone to capture your face and your outfit. This angle can be very unflattering for many. For some, it works, or this is the aesthetic they’re going for. However, if you’re here, then you know it isn’t flattering for you.
Never, and I mean NEVER use your hands to take a selfie. It’s better to have a friend help or position it yourself and back away from the camera. There are a few camera settings you’ll have to mess with before we can take the photo.
First, go to setting > camera > turn on “Grid”
This will add gridlines on the screen of your phone in the camera. With these grid lines, there are three important things to note:
Never center your face in the middle square as this leads to a boring photo. Aim to have your eyes meeting at one or two of the hot spots (where the lines meet).
Position yourself to align with the far right or far left line (whichever is your preference, you know your angle’s better than me). It’s better to leave one square open on the opposing end of where you are in the camera field, but you don’t have to!
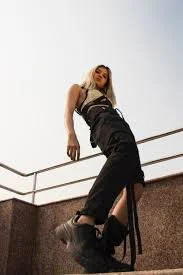
Next, set your iPhone on something stable. If you are out in public, I recommend carrying a tripod made for phones with you or have a friend take the picture (after explaining how to angle it, of course). With this, there are many different positions you can do. Following my instructions with the grid lines, the same concept applies to full-body photos. You’ll want to fill at least two squares, but with full-body photos or half-body photos, you can center yourself in the middle. Leave open space at the top, it’s rarely a good idea to leave open space (squares) at the bottom. This won’t draw attention to you and lead to a basic photo.
One more thing, you may need to set a timer on for your photos. I recommend using the full number of seconds so you can adjust yourself as needed.

Tip Two: Lights! Camera! Action!
Next, you’re going to make sure your lighting is neat. If you’re outdoors, be sure to have the sun on either side of you if possible. If the sun is directly above you, you may want to wait an hour or so before taking a photo. Having your lighting directly above you can lead to some awful shadows, especially if you’re a person who wears false eyelashes or has bangs. If there is no other option, shift your camera position slightly to either side, this can help lessen that shadow.
When indoors, however, lighting can be tricky. Try to use natural lighting because this will provide the best “glow” meaning the lighting won’t be so harsh you can see every single detail. If that isn’t an option, try aiming a lamp and covering it with a white T-shirt. The T-shirt will help soften the light.
There are also very inexpensive lighting options for purchase, such as a ring light. This works best for portrait photos. If that’s too bulky for you, there is also a mini ring-light that clips onto your phone. I like these the best since I am always on the go but investing in a ring light isn’t a bad thing either!

Tip Three: POSE
Body positioning can also help lead to a great portrait. Try turning one shoulder slightly towards the camera and relaxing the shoulder. Tilt your chin downwards slightly as well as tilting your head to the left or right. This will help make you appear more open.
If you’re taking a full body picture, try sticking one leg slightly forwards and resting on your other leg. Keep your arms closer to your body but relax them into a natural position. It’s important to relax in photos because it can show if you aren’t. It’s okay if it’s a bad picture, you can always take another one, don’t worry!
And that’s it! You know which poses work well for you. Apply the lighting and angles trips I’ve mentioned, and I guarantee you will see a difference. These tips are meant for all shapes, sizes, and colors. You are amazing just as you are, so go out and show the world!